
Are you a member of The Outlawz yet? If not, run don't walk over there and join THE PARTY!!!
We have over $800 worth of prizes, challenges, games, and the best community of people you have crafted with!!! So here's the details for the hop.
We have 8 blogs for you to visit, and each has either a tutorial on how to make something or a technique pertaining to paper crafting. But this hop isn't just about tutorials - we have prizes!
Each blog has a prize, and there is a
grand prize for one person who visits and leaves a comment on all 8 blogs.
To be eligible for a blog's prize, please leave a comment on that hop stop and
include your Outlawz user name.
If you become a follower of the blog, you will get two chances to win that blog's prize!
Each blog has different prizes, so you will want to visit all of them!
To be eligible to win the grand prize, return to this page after visiting and
commenting on each blog and enter your name in Inlinkz
at the bottom of the page by clicking on the blue froggy (add your link).
Let's get hopping! Have fun and good luck!
Blog Hop Order
The Outlawz Host: Colleen Holmes
CAS Host: Maureen Merritt
Greetings Host: anaRy Baumgarth
Color Host: Brenda Ogle
Sketch Host: Sandi Huggett
Twisted Thursdays Host: Sharri Seffens
Copic/Promarkers Host: Jo Ham
Paper Ala Mode: Rona Mallard - YOU ARE HERE
3-D SHAPE TUTORIAL - by Outlawz DT member Theresa
This is a short pictorial that illustrates how to make 3-dimensional shapes for paper crafts.
In this case, we are making a heart shape, but the possibilities are only limited by your imagination. You could use bells, ovals, circles, triangles, diamonds, squares, etc.
Materials:• Paper(s) of your choice
• Cutting tool for shape – can be a punch, a die, an electronic cutting machine, or even precut shapes that you purchased
• Bone folder (or some tool to crease your folds)
• Glue of your choice (I am using a liquid type of glue, but you can use anything that sticks)
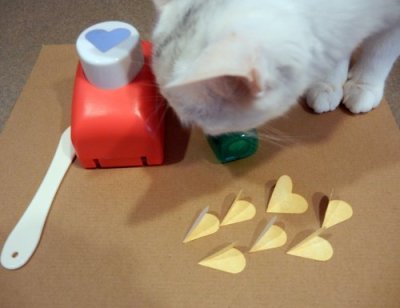
In this first photo, I have precut my heart shapes using the punch in the picture. I have 7 hearts punched, but you can use more or less shapes depending on how full you want your design to be.

Next, we need to fold each heart in half with the “mirror” sides facing each other as shown in the following photo. In my example, I am using all the shapes of a single color, but you can use two different colors and alternate them for some added interest.
And here you see all of the shapes folded. Baby came along to help make sure I was doing everything just right – I think she might have been questioning my choice of adhesive, but as I said earlier, you can use whatever you have on hand that sticks.
The next step is to start adhering the shapes together.
In this case, you want to adhere one “petal” or “side” of each shape to a matching side of the next cutout. See the photo below for the first two shapes glued together.

And here is the finished heart with all 7 of the shapes glued together. The more accurate you are with your folding and gluing, the better the shape will look. As you can see if you look closely, I was off a bit on my gluing, so you can see a few of the white edges from the backsides of the paper, since this was not a double-sided paper. You can finish the edges with some Stickles or glitter to add some more flair and cover up those edges if you like.

And this final photo is where I used the shape to make a card.

One nice thing about these 3D shapes is that they fold flat if you put them in an envelope. You can also use this same heart shape as a hot air balloon or a flower, which I did recently on a layout I made for my daughter’s graduation. Again, the possibilities are only limited by your imagination.
This is another gorgeous 3D project by Theresa.

Anne another of my team members from The Outlawz made this beautiful 3D project

and this gorgeous Easel card using Ippity set Straight from the Heart

My 3D card uses a Spellbinders Die to cut the butterfly and Ippity set All Things are Possible


AND Speaking of Ippity - I am giving away a $15.00 gift certificate to one lucky commenter on this blog post. You have until October 9th to leave your comment. Becoming a follower gives you another chance (please leave a second comment telling me you are following)
AND making an Ippity purchase gives you 5 additional chances!!!
***I am also giving away 2 more Ippity gift certificates during the Party so you will want
to join in the Outlawz games and challenges for more chances!!***
This is the end of the blog hop - the Outlawz Design Team hopes you enjoyed the inspiration as much as we enjoyed making the projects!! Don't forget to go back to The Outlawz and leave your name there for a chance at the blog hop grand prize!!

93 comments:
Each one is amazing and I think Baby wanted to be sure everything was lined up nice and straight, too cute.
Love everyone's designs and love your designs and stamps.
Hugs, Lori m
the tiredlady47 LOL
Forgot to mention I'm a follower.
Hugs, Lori m
super neat idea rona!
LOVE the 3D embellishments. Thanks for the tutorial
Great post Rona! Love all the projects! Big hugs!
This reminds me of the honeycomb paper people are using- I love to use things I have in new ways, thanks!
My Outlawz name is Sarah Welleford. Thanks for the chance to play!
This is just cute! Love tutorials. Thank you for sharing.
New stalker of your blog and an "old" Outlawmember, now hopping along home...
xx//MulleSnuttan
Thanks for the tutorial on making these. All the cards were fabulous. I'm a new follower.
Babe
youiesmom@att.net
Lovely projects girls....and a fantastic tutorial :) The heart looks fabulous.
Hugs xx
This is just so clever! Thanks for sharing it with us here on this fabulous blog hop. I will definitely be trying out your technique - I love those 3D shapes!
Luv n huggz
Jen Leeflang
aka JenLee
I am a follower of your blog now too!
Jen Leeflang aka JenLee
This is so clever! TFS!
Fabulous tutorial Rona. Love all the 3-D projects. I love your butterfly all popped out!! Hugs~Bren
Holy Scrap!!! The inspiration here is OVERFLOWING!!! You ALL created some MEGA GORGEOUS projects!!! WOW!!! I have the most talented Sistahs!
FANTASTIC tutorial Theresa!!! I love how Baby was yuor aide :) Can't wait to try this awesome idea!
LOVE YOU ALL <3
Fantastic tutorial Rona! I'm so gonna try it! Happy party!!
Fabulous idea, Rona! It really add a lot to a card! Love it, you and Ippity!
Hugz,
Roxann
Awesome tutorial & projects. You know I follow you already. I just joined Outlawz as Jamie :-)
Love this & all of the samples!!!! Your kitty is so cute :) Mine does the same thing, then usually plops right in the middle of everything I'm working on!!!
Lovinb the butterfly die cut...thanks for sharing!
Gorgeous 3D'S!! Love how easy these are to make!!! Super fun effect on a project!!!
Great projects!!
Silvia2
Great tutorial and nifty idea. TFS :) Now a follower. Hugs, Lee Ferns
Those are so cute! Thanks so much for sharing. I am a follower and a memember of the outlawz!
Joan Manthe
www.donebydoretta.blogspot.com
This is such a cute idea Rona. I can't wait to try it.
Well, I'm glad Baby was there to supervise--great technique, it adds such fun touch. Thank you for the tutorial, Rona!
Outlawz trisha too, blog following you here, and thank you for the fun stop on the hop!
:)
How cool is this, th anks!
WOW so much inspiration. All of them are wonderful! My user name is Kim Kelley
Rona, oh my gosh, I love this and you will see it on my future projects!! I love the idea that you can mail them easier than any other 3 D embellishment! TFS!! BTW love the photo and comments about Baby...made me giggle!
Rona, I love your project and your tutorial. Great inspiration.
What a great tutorial. Thanks for sharing.
Rhonda Miller
Super Cute idea! I have a gazillion punches, and I love the dimension and interaction this gives. Gonna definately give this a try. Thanks for sharing. -Katt
Definately Following now too :)
Love 3D embellishments, thank you for sharing a great idea with a wonderful tutorial! Hugs!
Oh, this is FABULOUS, thanks for the tutorial, I will be trying this very soon.
This is awesome Rona and your cards I gorgeous! I love the look of the 3D shape and am definitely going to try this!
What a great idea for an embellishment. You and your team members' projects are all wonderful.
Hi Rona,
You always make the best embellishments -- especially your fantastic flowers! I'm always in awe of your talent and all the wonderful projects you create!1
I am also excited because I made it through the WHOLE HOP!! WOOHOO!!!
Thanks for the fun and some awesome new inspiration!!
Hugs,
Lis
wow..what a great tut..can't wait to try..love love the card..tfs..loves ya
Gail Neduzak
what stunning projects Rona!!! love the 3d heart - so precious!! heheh, the kitty checkin' things out is such an adorable shot!! ~hugs
Beautiful creations! And I love the little dimensional shapes! Makes the cards that much more special! thanks for sharing!
Lorraine N
Beautiful cards! Love that 3-d look. Thanks for the inspiration and all you do for Outlawz!
Hugs,
Donna Rinckel
Beautiful 3-d creations, all so inspiring! Nice that you can make your own embellies with punches, thanks for the great tut!
Great cards!
Thanks for the tip and inspiration
great idea
Great tutorial, Rona. What an easy way to add some exciting interest to a card. Your projects are terrific and the DT did a bang up job, too.
My Outlawz member name is Teresa Arsenault and I am following your blog.
Blessings,
Teresa
I am a follower.
Teresa Arsenault
Baby is a STAR!
This is one of my favorite ways to add dimenstion. Your pumpkin is tooooo cute :>)
Love your little helper too!!! My Outlawz name is Julie Elak!
Way cool! Thanks for sharing! I am a follower and a member of the Outlawz. thanks for the chance to win.
slbela59
Love the idea! Tanks for it.
Thanks for the tutorial (Love your kitty) I can see this being very useful.
Michelle Rutledge
Windsorm
I've never made a 3D card but have seen some cute ones. Thanks for the directions.
Tammy White
tammysmakingmemories.blogspot.com
I also became a new follower!
Tammy White
tammysmakingmemories.blogspot.com
Very cool Thank you for sharing!
Michelle Houghton
Hey Chicks, I just made some 3-d Christmas trees for some projects that I am selling in a new shop. I am lucky to have my office right next to the Accucut dies and machines at the Univ I work at. Made some pumpkins for our office decorations like that and some apples too. THANKS FOR SHARING!
lOVE YA
SYD
SYDEGAN@HOTMAIL.COM
Rona,
Thanks for the great tutorial. This 1000 member party has been so much fun with the blog hop for terrific inspiration and the fun games.
Barb O.
miatagal@shaw.ca
I love your 3-D tutorial! You have truly inspired me! I also love your blog.
Really amazing!
I love how this looks, will count on using this sometime.
I've been browsing your site too!
It's amazing how creative you are.
Love,
Jang-Art
Fabulous!!! How nice to make your own embellishments! Will definitely give these a try! Thanks for the tutorial!
What beautiful work you and kitty did. Love the 3-D heart and pumpkin. Thanks for the tutorial.
Love all the 3-D samples...and love that your cat came to check it out LOL! Mine would be swiping them off the desk! My Outlawz name is Jen P
Rone this is gorgious i so glad i foud this site and the designer are so helpful im off to make a punkin
These are awesome, thanks for giving me this great itdea.
Sarah Warren
thanks for the idea. i never thought of it. -Kristina "Mama Bear" Stonich
Love LOVE this idea Rona! Thanks so much for sharing this with us for the hop. :-) Hugs! Tracy MacDonald
What a fabulous idea!! Might have to give these a try!!! TFS!! Hugs Alethea JOhnston
Forgot to mention I am now a follower!! Hugs Alethea Johnstonx
Very nice technique. Thank you for showing it, will try it.
vesna Rastovski :)
Beautiful projects! I love your 3D Pumpkin and heart. Thanks for a great tutorial.
thnks for the tutorial!!! My outlawz name is Heidi Brawley
What great idea's! I really like the heart one will have to try that!
I am also going to become a follower! name i follow by is gramig05.
I think my name on the outlawz is RosieG
All the cards were beautiful, thanks for sharing this idea. My Outlawz name is JoAnn Peck
Amazing tutorial! Anitamocha
Thanks for sharing the 3-D tutorial. All the cards are very pretty.
Hazel
What a great way to add interest and texture to a card! Thanks to you and Baby for the fabulous tutorial!!
Outlawz member: Nadine (wahinelei)
I love this concept. Thanks so much for sharing the instructions.
This is fabulous! Love the 3-D shape using a heart punch! Absolutely wonderful! The cards are gorgeous! Thanks so much for sharing this awesome idea and tutorial! My Outlawz name is Kym Weber.
I'm a follower now!
Thanks for the tutorial. All of the projects are fabulous!
awww baby is so cute, lil over seer huh, lol bet shes great company, my lil chevy hangs out with me while I craft. All these projects are awesome, love them all, I did that same techique with snowflakes on a bag front once. It comes out so awesome, and that Spellbinders butterfly set is the next item on my wish list, at 60.00 it might take a while.
ty for a chance to win, following your blog now tooo ;) wow what a great hop
Wonderful! Thanks so much for sharing :O) Hugs! Leah Ann
Rona, super tutorial! I love the fact that this kind of dimension will go through the mail easily! Thanks to you and the other DT members for such great projects! Hug, Pat C.
Love this and will be incorporating it onto my paper crafting projects very soon!!
Cindy Royal (outlawz)
Thanks for sharing this ... It's a perfect embellishment for Christmas cards which I'm about to start (thinking about) making lol ... And Baby is just too cute ... Julie (username Julie Hales)
I am peeking in from the Outlawz Party and Hop. I love the 3D tutorial. I am definitely inspired to try this out. Your DT is bursting with talent.
I thoroughly enjoyed the entire hop!:O)
Jessica
I am a new follower, too. Would love to have you stop by my blog sometime!
:O)
Jessica Shelton
This is a wonderful tutorial. I never thought of making 3D embellies with punches. Thanks for sharing!
All so cute - really like seeing the pumpkin done this way, will use this idea this week, very cute.
What a fantastically great idea! Thanks so much for sharing your knowledge and your time with the rest of us.
Shelby Thomas
what a great tutorial, rona, and your cards are stunning, as always:)
That butterfly is amazing! Great tutorial - now following,
Jen
jmueller409 at yahoo dot com
Very Nice! Thanks for sharing... glad the kitty could help, mine loves to try and "help" me too..lol
My Outlaw name is Tracy S and I am a follower
Thanks for sharing your 3-d project. I'm glad that Baby takes an interest in your crafting!
R/
Hi!
I need to do something like that.. love the hearts. Beautiful creation.
I see you on The Outlawz
-Sony
Sonia-Studio60
Post a Comment